Page 2 of 3
Re: seat-pan progression
Posted: Fri Oct 08, 2010 2:28 pm
by vanzen
Major Softie wrote:Very unique work. I like it.
BUT, this is an Airhead site, right? You are still running a Nohead.
True that, Major, but ...
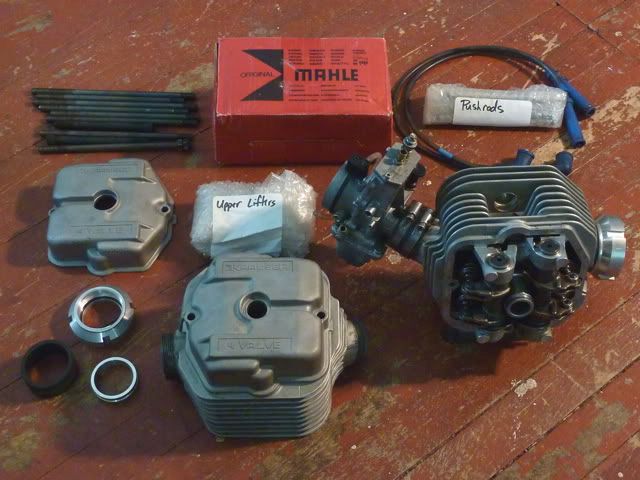
On the shelf:
Re: seat-pan progression
Posted: Sun Oct 10, 2010 3:51 pm
by Chuey
Wow, that is turning out great! I love the tank. The "stop" lens is really cool. Your braketry looks very nice. Do you have a brake or are you doing the bends in a vise? I use the vise or bend it by clamping to the wooden work bench.
Vanzen, I am impressed to a degree that I can't put into words at how that bike is turning out. Is it possible for you to tell me how much of the work is planned and how much is stuff you come up with as you go along? Mine is pretty much winging it as I go along. I know you planned out the frame, engine, and wheels, but don't know about the rest.
Chuey
winging works
Posted: Sun Oct 10, 2010 7:31 pm
by vanzen
Chuey wrote:... Do you have a brake or are you doing the bends in a vise? I use the vise or bend it by clamping to the wooden work bench.
No brake – A vise, clamps, hammer, and torch. A hack-saw and files.
Chuey wrote:... Is it possible for you to tell me how much of the work is planned and how much is stuff you come up with as you go along? Mine is pretty much winging it as I go along. I know you planned out the frame, engine, and wheels, but don't know about the rest.
I try to be well prepared simply as a matter of efficiency –
But then I am always receptive to the creative impulse.
Good decisions (technical or aesthetic) cannot always be anticipated, it seems.
I suppose it would be fair to say that I start with a "negotiable plan",
and that I most enjoy seeing that plan evolve into some thing that is beyond previous expectation.
Certainly a "creative process", fluid rather than fixed or rigid.
Re: seat-pan progression
Posted: Sun Oct 17, 2010 5:04 pm
by The Veg
VERY nice!
Re: seat-pan progression
Posted: Thu Oct 21, 2010 12:38 am
by Flatwins
vanzen@rockerboxer.com wrote:Major Softie wrote:Very unique work. I like it.
BUT, this is an Airhead site, right? You are still running a Nohead.
True that, Major, but ...
On the shelf:
Drool..... Looking good, Vanzen!
Re: seat-pan progression
Posted: Thu Oct 28, 2010 11:37 pm
by vanzen
A rubber band holds the tank in place ...
Re: seat-pan progression
Posted: Fri Oct 29, 2010 8:07 pm
by Flatwins
[quote="
vanzen@rockerboxer.com
A rubber band holds the tank in place ...[/quote]
And that's all ya need!
Re: seat-pan progression
Posted: Sat Oct 30, 2010 12:47 am
by robtg
And that's all ya need![/quote]
Round vacuum cleaner belts and closed cell foam padding underneath and no metal to metal contact will do it.
Re: seat-pan progression
Posted: Sat Oct 30, 2010 11:19 am
by vanzen
robtg wrote:
Round vacuum cleaner belts and closed cell foam padding underneath and no metal to metal contact will do it.
...
+ 2 locating nobs w/ rubber bumpers on the frame (similar to stock) up front.
Neoprene was used for the padding. Removing the vacuum cleaner belt & 2 quick release fuel connectors
allows the tank to be removed from the frame.
Battery & regulator / rectifier are frame mounted above the starter,
coil on top of the (cut-away) engine case to the left of the starter.
– Engine electrics are easily accessible with tank removal & centrally located at the CoG.
Old 'sKool Tech.
T-light bracket under the plastic:
Posted: Thu Nov 04, 2010 11:15 am
by vanzen


